Not so long ago I was looking for a fun 2nd car. Something that could be driven round a track when I felt like some fun but also something that required some work as I love working on cars. As one of the few older rear wheel drive small sports cars that are still affordable I noticed the Mazda MX5 and specifically the MK1 version. I took a quick look and found there was a massive following for these cars but not only that, a quick search of Autotrader pulled up only a few for sale in the whole of the UK. Ebay brought up quite a few but the bottom line is the MK1 version is becoming rare. I realised this meant not only would it be some fun but potentially also a good investment as the values will likely rise so I set my heart on finding one.
After doing a bit of research it soon became apparent most of the MK1’s available were either silly money or rust buckets. I scoured ebay and of the ones I found I put the registration number into the DVLA MOT history check and it was clear to see that the vast majority had failed due to rust issues that were often sorted out. That meant welding, filler and if you were lucky a good job had been done. I did find a couple of decent examples and went to view them but for one reason or another didnt bite the bullet. After more searching I found one on ebay that had been reduced as it was January and a dealer was looking to shift the old stock. I punched in the details in the DVLA history check and discovered this particular car had done just 50 miles in 8 years and no mention of rust in the MOT history. The only issue was that this car was 100 miles away so I couldnt just pop down and have a look. I decided to phone the dealer and was told that the car had been under cover in a barn for 7 years and they just needed to get rid of it to clear stock. The story checked out with the MOT history I just read and I thought it may just be a decent one. I told the dealer I was going to travel 100 miles to check it out and leave with it. He advised me to put a deposit so he could hold it for me. Normally I would never do something like that but in this case I believed it was worth taking a chance so I paid a small deposit and booked my train ticket to Kent. The next day I turned up and test drove it, paid the cash and left. I have to say I felt a bit nervous that I had to drive 100 miles in a 25 year old car that was essentially out of action (albeit MOT’ed) for many years. So, I took off and while it seems like a hair raising journey I made it back in one piece. I was absolutely gob smacked to find out that the risk paid off and it is the most rust free MX5 I have come across and nearly everything worked as it should. It is even the fully loaded model with power steering, electric windows and air conditioning.
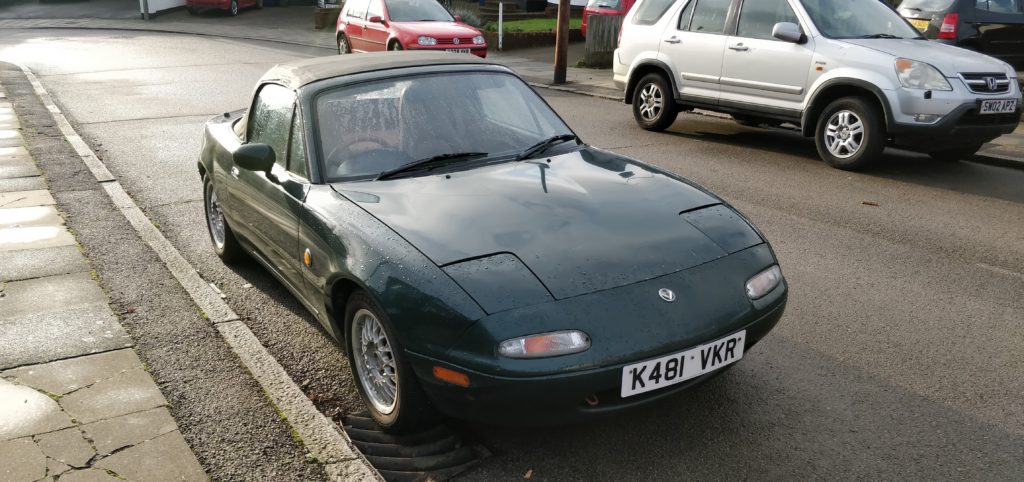
In the end I was delighted to get hold of this car and after checking it out found that it really was in great condition and a fantastic deal.
I have later found out that this car is a limited edition Eunos Roadster namely the V-Special, which came as a 1.6 with a/c, power steering, electric windows, light cream leather interior, speakers in the headrests, BBS alloys, wooden Nardi steering wheel, gear knob and handbrake handle. It also came fitted with a torsen limited slip differential. It also has the original mats in with the metal V-Special dog tag on.
So far I have identified some issues and done the following work on the car:
Squeaky belt
Strangely enough the alternator belt wasnt squeaking when I drove the car home but after a week or so it was squealing like a pig. I did some reasearch and found out how to tighten it up and sorted that small problem out.
Coolant Hoses
Eventhough the radiator had been replaced by the dealer I noticed we were still running some very old hoses. Not very squeezable and quite crispy. So, I decided to get hold of some green silicone hoses and have them fitted. Now I have confidence Im not going to end up with a split hose away from home.
Radio
The original radio supplied didnt work so I will be ordering a new one.
Leaking rain rail
So the car was leaking into the boot and at first I thought it was coming from the high level brake light. Then, I believed it was coming from the Frankenstein bolts. After checking everything out I came to the conclusion it could only be coming from the rain rail. What a PITA it is the worst place to leak from. So, I took out the rear parcel shelf carpets and while the carpet was dry the underlay was soaking and after pouring a kettle of water over the hood I could clearly see where the rail was failing from.
I removed the old rain rail and found it was cracked everywhere as it is made with a very brittle plastic that once it reaches 25 years old is pretty much useless. There are plenty of guides online that recommend repairing a rain rail using aluminium tape so I gave it a shot and ended up using quite a bit of ali tape. Unfortunately, it didnt work and no matter what I did I could not stop the leaking. So, I order a brand new and redesigned Robbins Rain Rail from Moss Europe. It was made out of a very flexible material, nothing like the old one. It also came with some new rivets and foam washers that helped seal the rail at the bolts.
I waited until a nice sunny day then proceeded to fit it. I removed the bars that hold the rain rail into position and as they had some flaking paint on decided to spruce them up so I resprayed them in gloss black just like they originally came. I also spent time to clean the bottom of the hood with a toothbrush that gets clamped in between the rain rail. Once I had everything prepared I bolted it all back together and poured some water over the hood and hey presto theis no longer leaking. Job done!
Gearbox oil
This is a manual gearbox and I noticed it can be a bit crunchy into 2nd gear when cold (which is a common issue with these cars). I know from experience just how much of a difference new transmission fluid can make so decided to treat the car to some of the better Redline MT90 fluid. It made a bit of a difference and I now have assurance the tranny is running good oil. I later found out the fix for the shifter problem was actually to rebuild the shifter, which I did at a later date and combined with new oil has given the car a very slick shift. Full details of what I did are in the Gear Shifter section below.
Service items
Since I had no idea of the last time the car was properly services I replaced the engine oil, air filter, oil filter, HT leads and spark plugs. I use NGK plugs, custom HT leads from Autolink and some Mobile 0w40 fully synthetic engine oil. It made a big difference. The engine runs unbelievably well. I still cant understand how a 25 year old engine runs so good.
Exhaust mount
I noticed a clanging noise coming from the rear end of the vehicle. Sounded like some suspension parts were finished but luckily after inspection I found that where the dealer installed a new exhaust they used old rubber exhaust mounts that were stretched and left no clearance between the reason sway arm and the exhaust pipe. A new rubber mount fixed that issue and now the metal clanging is gone!
Speedo KPH > MPH Conversion and Speedo
I noticed the speedo cable was sticking out the bottom of the car. I couldnt figure why it was and when I looked at the connection to the gearbox it looked strange. Not like other similar connections I have seen online. When I took the car into the garage to have them change the oil the car was on the ramp and the mechanic told me he tied up the cable so it wasn’t hanging down. When I asked why it was hanging he explained an adapter had been fitted to make the KPH dash show MPH. I also notice the speedo needle wobbles at speed, which usually indicates a bad cable but this could indeed jus the adapter. In addition I noticed that the dash had the screen replaced and a MPH sticker was put over the KPH sign as the car was an import. I then understood something good about the car. The car has 106k “miles” on the clock but the clock used to be KPH before as it is a Japanese import. So, part of those 106k “miles” were in fact kilometers and we know this car wasnt used much in the past 8 years which meant that this car has probably done closer to 106k kilometers than 106k miles. Good news, a low mileage example.
I eventually replaced the speedo with a second hand one from a Japanese import that had been converted by using replacement dials. I was able to dismantle the speedometer and correct the clocks before I did this, which was surprising easy taking only a few minutes. I now have a working speedometer that reads in MPH but a mileage/km counter that reads in Kilometers.
Brakes are F*#$@d
I noticed the brakes never had much feedback and I have to say they dont give you much confidence when you step on it. At first I thought this might just be because we are dealing with an old car but the mechanic put me straight and said “the brakes are fu*#3d” so I guess we need to do some work. I tested the servo and that seems ok as the pedal sinks to the floor when you start it after having pumped all the pressure out of it. I also know the brake pads and discs are nearly new. The mechanic believes either the calipers or carriers are partially seized. I’m thinking of upgrading them to the 1.8 model brakes (which is done just by switching out the carriers and reusing everything) or even better the mk2.5 1.8 spot big brake kit, which is meant to be the biggest bang for the buck.
Finally I had the chance to look at the brakes with my neighbour who is a car geek. I purchased a caliper seal replacement kit as I decidedto sort out the original brakes before doing any upgrade. After spending an afternoon to remove and replace all the seals it became apparent that the only issue with the brakes were the fact the slide pin grease had turned into chewing gum (probably the wrong type of grease was previously used). In any case we proceeded to replace all the seals and rubbers and clean up and put new grease on the slide pins. After doing that just on the front brakes I am happy to report they now work much better when you really step on it. Very pleased but I still have to do the back ones, which I expect to be the same deal and give me stock brakes as good as they can be.
Gear shifter boots and bushes
So, a common failure on these cars is the gear shifter boots deteriorating and at the same time its best practice to change the bushes as they are almost always likely to need replacing when the boots go. I ordered a shifter rebuild kit from Moss Europe. At first I was going to order a much cheaper one from MX5 Parts but it did not include all the bushings. So, I opted for the pricier option that included everything.
When the shifter rebuild kit arrived I removed the old shifter and extracted the old turret oil with a small syringe. The old oil was very gloupy and full of tiny metal filings (which is very normal with all old gear oil). I used some engine oil to fill it up and suck it out a couple of times to flush out all the crap. I took the old shifter out and inspected it. I was hoping the bushes were completely knackered but in fact they were not in such bad shape although there was a little play. I did notice however there were a few score marks on the joints that sit on the bushes and some rust of the shaft. I used some very high grit sandpaper to get out any imperfections in the joints and then used Brasso to polish it up. I proceeded to paint the shaft with some primer and black spray paint. Once I got the shifter back in decent condition I then filled the turrent with gear oil, assembled all the bushes back into position and bolted everything back up and put the boots on. I didnt expect this to make much of a difference as the only improvement I expected was due to replacing bushes that had very slight play in them. However, upon firing the car up and taking it for a spin I was pleasantly surprised. The shift action was positively improved quite significantly. After assessing what I did I believe it was because there is not only new and tighter bushes but dirty turret oil was replaced, scratches to the joints were removed and the boots also remove clunkiness in the gear changes. Now the car is much more fun to drive so I am very happy with this result.
Interior strip, clean and rebuild
The car interior is dirty, old and smells of engine. Therefore, I have started working to put life back into the car and restore the interior to its former glory as well as do a few upgrades. So far I have done the following:
- Removed the tacky aluminium dash inserts that were fitted
- Removed and washed the stereo and heater surround
- Removed and washed the centre console
- Removed and repainted the jack handle holder and metal cover that protects the fuel filler line in the boot
- Removed and cleaned all carpets with washing powder and a pressure washer then left to dry in the sun (still considering to replace carpets at a later date, budge permitting).
I also plan to do the following:
- Retrim the door cards
- Repair and re-colour the leather seats (they are not so bad that they could be repaired with filler and dye to a lovely condition)
- Leather gear lever gaiter
- Wooden gear knob (not a fan of the chrome one)
- Varnish the original wooden handbrake cover
- Recolour the door and dash slam panels
- Clean the dash (and potentially trim it in leather cost and difficulty pending)
Breakdown, diagnose/repair, CAS o-ring and ignition timing
So, for all my talk of these cars being reliable my 25 year old MX5 broke down after a long drive one day. Luckily enough it was just outside my house and after going down dozens of country lanes finally got stranded at home!
Basically, the engine cut out and trying to start it resulted in the engine ticking over for a second then cutting out. It really baffled me and quickly learned it was a fault with something electrical. I found that this car has a diagnostics port and requires a 12v LED to be connected, which flashes to read out the fault code. I ordered a 12v LED from ebay and connected it up when it arrived. I had what I thought to be one long flash (fault code 10) which according to forums and literature available online means air intake thermistor. I went on some forums for advice and also spoke to a couple of mechanics. Many told me cam angle sensor and others told me air flow meter and I also read it could be ECU or coil pack. So, I went around things the wrong way and instead of believing the code I listened to what I read and heard and bought a cam angle sensor and also an ECU. I replaced them and it didnt fix it. I then found out the thermistor was in the air flow meter so I was certain and bought a used AFM. It wasnt that. I was then stumped and realised I read the codes wrong and what I had was an ignition fault (fault code 1, which is a short flash), which means coil pack or ignitor module. I went for the coil pack and it didn’t fix it. At the end of my tether I bought the ignitor module and to be disbelief it was fixed (as I replaced just about everything else it could have been). I now have a very good understanding of the electrical system of the engine and have a good stock of tested parts. The whole exercise didn’t cost me too much as I bought everything used on the bay but I learned so much.
One issue I had created though was the fact the cam angle sensor (also known as CAS, which also doubles as the crankshaft position sensor) sets the ignition timing by the angle it is fitted to the end of the camshaft. So, I need to do the timing again since I removed and refitted it. While I was at it I replaced the CAS o-ring with a new replacement as I found the original was leaking. I bought a Draper timing gun and had a little fun setting the timing to the factory recommended 10 degrees. There is a 14 degree advanced ignition timing mod that is good with high octane Euro fuel but I decided to leave it stock for now. I have to say it seems to run a little better now.
Suspension issues
The was originally on stock dampers and I was been advised the rear dampers were shot by two independent mechanics. I can also feel the car bouncing around when going over uneven roads. At first I didnt realise it but it became very apparent something wasnt right when going over bumps in the road at speed and consequently feel like you hit the eject button in a James Bond car..
The preferred solution is a set of coilovers and there is a very big selection. After some research I found that the stock Bilstein setup found on the mk2.5 is a direct fit, they generally last for 200k miles and better than many of the cheaper coilovers (albeit damping and height will not be adjustable). However, for an outright improvement (without spending thousands) it seems VMAXX coilovers are the best solution. In spring 2019 I pulled the trigger on a set of VMAXX coilovers and proceeded to fit them myself in the summer. While I was at it I found all the eccentric bolts for adjusting the camber, caster and toe were all completely seized. This was discovered when I had to undo one to remove one of the control arms as a captive nut had broken loose and it needed it on the bench to fix it. I also discovered all the sway-bar drop-link bolts were all completely seized. So, I replaced all the eccentric bolts and drop-link bolts with new ones. After that I took it into a shop near my house that has a Hunter Hawk-Eye and had a full 4 wheel computer alignment done. The improvement in ride and handling is not as dramatic as I expected but it is noticeably better and feels much safely going over uneven road surfaces at speed. The steering wheel now also points straight!
To top off the handling I fitted a strut brace under the hood. It is an Il Motorsport one which doubles up as a brake stopper/brace. Now, the brake pedal play created by flex in the firewall is gone and I have a more firm and confident feel on the brake pedal. Quite satisfying finish to the suspension job.
Overheating and thermostat
Just after I replaced the speedo I went out in the MX5 and noticed the heat gauge was going all the way to the right indicating the car was overheating. Naturally, I suspected the new gauge was out and continued driving regardless. When I got to my destination I heard a bubbling sound and noticed some water had escaped from the expansion tank overflow. Immediately, I panicked and believed I have burned out the engine. I let the car cool down and proceeded to diagnose the issue. I found out the fan was not coming on, which at first led me to believe it was a fan issue. I tested the fan by jumping some connectors in the diagnostics port (cant remember which ones now but it can be found online). I found the fan worked fine so I believed it must have been the fan heat switch which is bolted into the top of the thermostat housing. I run the car and felt the thermostat housing and the radiator and noticed the radiator and top of the thermostat housing was not getting hot while the temperature gauge was skyrocketing and the engine was getting red hot. I therefore believe the thermostat must be stuck closed. I proceeded to unbolt the thermostat housing (snapping a bolt in the process) and sure enough after dropping the thermostat into boiling water confirmed it was stuck closed. So I ordered a new one. I the meantime I had the issue of the snapped thermostat bolt, which apparently is common. My options were get whats left of the bolt out the housing, drill it out or replace the housing. Since replacing the housing meant as much work as replacing the timing belt (which was recently done) I decided to try the other two options. Whatever I tried I couldn’t get the stuck bit of bolt out so I drilled it out and tapped it. However, I felt the thread in the aluminium thermostat housing was too weak to take a proper amount of torque so I ordered a longer bolt and screwed the bolt up from below, creating a stud which allowed me to secure the top piece of housing on with a nut. It was perfect and I topped up with freshly mixed green coolant and hey presto it was fixed and now the cooling system is repaired.
Clutch master & slave cylinder and braided bypass hose
One day I went out for a drive and I noticed the clutch biting point was getting lower and lower and just as I returned home I was finding it difficult to change gears as it get so low. I did some research and identified it was likely the clutch slave cylinder, although could also have been the clutch master cylinder. I squeezed the gaiter on the clutch slave cylinder to see if it was leaking fluid as sure enough it was so I knew what to replace. A quick search online and I found an Exedy slave cylinder from Bofi Racing was only £15 and while I also came across a braided bypass hose and an original Mazda clutch master cylinder rebuild kit. The braided bypass hose by HEL connects the master cylinder directly to the slave cylinder and bypasses the old rigid and flexible hoses and apparently it gives a better pedal feel. I therefore decided to put a new slave cylinder, rebuild the master cylinder and fit the braided HEL bypass hose. I got to work and had it done in a few hours. I found thick black sludge in the master cylinder tank so really happy to be replacing the whole lot including pipework. I cleaned it out throughly, rebuild the master cylinder and fitted it all back with the HEL hose and new slave cylinder. After a quick bleed it was done. The result was impressive. The clutch biting point was now near the top of the pedal and I had a much more responsive pedal. In addition, I often noticed some crunching into 2nd gear ever since I got the car but that has now just about gone so probably it partly was a clutch clearance issue. Very happy with the result.
Underseal, Cambelt, Waterpump and Drive Belts
I wanted to protect the chassis from rust and knew I needed to find a specialist to underseal the car. I searched all over the UK and came across The MX5 Restorer, who offer this service and specialise in these cars doing all mechanical work and they have a nice Vlog. I phoned them up and got it booked in. It was a 2 and a half hour drive and a train ride back. It was with them for a week. While I was at it I asked them to do the cambelt for me as it was never done. I replaced the water pump and all other belts since they needed to come off. They told me they destroyed the main pulley trying to get it off so replaced it with a used one off one of their many breaker MX5s. They did a great job with the underseal and I now know exactly where to go for bodywork and mechanical repairs.
Wheel alignment bolts
When I did work on the suspension I previously had to fit replacement used camber bolts. It was always something that I wasnt feeling great about as those bolts essentially hold on the suspension and wheels. So I ordered a set of genuine Mazda camber bolts and had them fitted and another alignment done at a local garage.
Others things done so far:
Since I dont have time to write everything up I have done I have listed a few points of other work I have done below:
- Bought hard top
- Speedo change
- Window winder bushes
- Window door weather strips
- Boot fuel line cover repainted
- Antenna hole plugged
- Bosch battery
- Replacement spare wheel harness
- Expansion tank removal & clean
- Silicone hoses
- Leads, sparks and filters
- Modern window wipers
- Timing
- Underseal
- Front calipers built
- Rear caliper slider pins fixed (were seized both sides)
Things to do:
- New electric window regulators to be fitted
- Interior new carpets
- Interior new sport seats
- Leather gear stick and hardbrake gaiters