 About 12 months ago our family technology company was asked to set up a CCTV system in a large hotel apartment complex. Our customer wanted to cover the perimeter with 9 cameras and also install a number of dummy cameras around the complex. To give you an idea of the size of the place we are talking about it is about 300 meters in length and about the same wide, contains 28 apartment blocks and a central building, as well as a water park, swimming pool and outdoor restaurant. At first I toyed with the idea of installing analogue cameras and running hanging wires on catenary cables between the apartment blocks, but after working out the labour and materials required it became extremely expensive, and as usual the customer wanted something inexpensive. Then I looked at the idea of transmitting the video signal through wireless means somehow. In the end I realised the only way I could confidently do this was with WiFi and IP cameras so I planned out the whole installation and put in the offer and after a bit of negotiation we got the project. After getting it I found out that our competitors came in at over double the price with a wired solution, claiming that “there are no such thing as wireless cameras”!
Here is what a satellite image of the premises looks like so you can get a better idea:

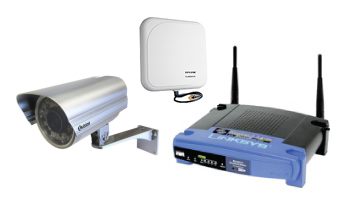
OK, so here’s what I used:
- 9 x X-Vision IP Cameras, Bullet Type (PSUs included)- X100B
- 1 x X-Vision N400R Network Video Recorder
- 1 x Acer Monitor
- 8 x Linksys 2.4GHz Router (to be used as access points/clients)- WRT54GL
- 6 x TP Link 14dBi Directional Antennas – TL-ANT2414A
- 1 x Unbranded 15dBi Omni-Directional Antenna
- 2 x Cisco 5-port switches – SF100D-05
- CLF200 low-loss coax cable, shielded CAT5e, 0.75mm 12v Power Cable
- N-Type, RP-SMA and RP-TNC coax crimp connectors
- General materials such as IP enclosures, copex, tracking, screws etc.
Our customer provided us 240v AC power inside water resistant enclosures at each camera location and wherever a wall wasn’t present poles were provided, which helped a lot. Although it sounded like an easy job to physically install 9 wireless cameras it wasn’t quite as simple as that. First off, the cameras were physically wired to the wireless access points, which were anything between 5 to 30 meters away from the camera itself and in most cases on the roof of an apartment block. Then, cabling had to be provided from the main access point on the roof to the managers office in the main hotel building. So, even-though the solution was transmitting the video data wirelessly we had to do a lot of hard wiring, which mean using a lot of tracking and copex, drilling holes and crimping connectors; one area even required us to run and bury power and data cables underground between one apartment block to the next, inside copex. Also, since we were using outdoor antennas a few metres from indoor access points housed in water resistant enclosures I had to make up coax cables using low-loss CLF200 coax cabling and a combination of connectors that I crimped myself.
Anyway, after finishing what seemed like a mammoth installation for 9 cams the real work begun – the configuration. I used the Linksys WRT54GL for its decent Broadcom radio set and installed DD-WRT for its advanced bridging and configuration capabilities.
Although we had 9 cams we only used 6 wireless access points in client mode to transmit the cams video data back to the main (root) access point. 3 of the clients would be connected to 2 cams each and the remaining 3 clients would be connected to 1 cam each. We were able to double up some of the cameras with a single access point because some of the cameras were located quite close to one other.
The way I wanted to set-up the wireless network was to work as a point to multi-point bridge. Therefore, this would put the cameras and network video recorder all on the same network using the same IP address range, gateway and DNS settings. This allowed the cameras to work with the NVR, which kind of goes without saying but it also provided Internet access to all devices on the network, which was important because all of the cameras and access points needed to sync with an NTP time server. This was because the cameras time-stamped the video before the signal is transmitted to the recorder and also because I wanted to leave the option to automatically restart the access points at specific times (although I didn’t configure an automated reboot in the end).
Before the installation began and at our office I flashed all of the Linksys WRT54GL routers wth DD-WRT build 14929 mini (Brainslayer) and I configured one of the routers to be a root access point by removing the gateway functionality using the long method from the DD-WRT wiki here. After that I configured the remaining 7 routers as clients to connect to the root access point I created again using a DD-WRT article that can be found here. I used a strong WPA2-AES password for security and I also chose to hide the SSID as there was no use in broadcasting it since it was a private network and its best not to give hotel guests the impression there is a network available. I tested it all in our office and it worked like a charm.
After the installation was completed I switched everything on and that was the moment of truth. Normally when you do this on an installation like this there is nearly always an issue so I expected something and low and behold we turned it on and only 2 cameras came on the screen. But, I have to say the image quality was absolutely excellent and blew the manager away, who unfortunately saw that 7 of the 9 cameras weren’t working at that moment. Now before you read further I want you to understand that this was the first time I did an installation of IP cameras so excuse my inexperience (all of my experience to date was with analogue cams and WiFi APs/bridges). So, I checked the signal at all of the access points and found that they all had strong signal. After some testing I found out that if I disabled all of the cameras and turned them on one by one they all worked perfectly. The next thing I noticed was that each camera was using ~5mbps of bandwidth, which I was shocked about as I quickly realised the WiFi network could not take it. Fortunately this speed was with each camera at maximum resolution, minimum video compression and at 30 frames per second, which could all be adjusted. I spent quite some time adjusting these settings to get a compromise of quality and reliability and was all I needed to do to get the system up and running. In the end I had to reduce the resolution from 1280×1024 to 640×480, changed the quality from 90% to 70% and reduced the frame rate from 30 fps to 3 fps. Unfortunately, 3 frames per second is noticeably jerky but the management understood that there were some limitations with wireless data transfer and it met their requirements.
We were using Wireless G equipment so in the best case scenario we would have 36mbps (54 is never possible) but in a real world situation due to interference, weather, distance, cable-loss etc we would never achieve that. I left the DD-WRT setting to the default setting of Auto for data-rate and at the root access point I could see it jumping around anything from 5.5, 11, 24, 36 and sometimes 54 mbps speeds all day long. We had to work with the lowest possible guaranteed bandwidth for the cameras to work reliably. Now, being that there are 9 cameras if I had to split a reliable 3mbps of bandwidth between them equally then the maximum data rate per camera would be around 330kbps, and the bandwidth would be shared out as follows:
Client 1 (1 cam): 330kbps (330kbps per camera)
Client 2 (2 cams): 660kbps (330kbps per camera)
Client 3 (1 cam): 330kbps (330kbps per camera)
Client 4 (1 cam): 330kbps (330kbps per camera)
Client 5 (2 cams): 660kbps (330kbps per camera)
Client 6 (2 cams): 660kbps (330kbps per camera)
Total Bandwidth Used: ~3mbps
At first I did this and although there was enough bandwidth clients 1, 3 and 4 that have the most bandwidth were taking priority. This resulted in a lag of 10-20 seconds for those cameras sharing an access point and when the system booted they also took longer to connect. Therefore this had to be balanced by adjusting the bandwidth quality/compression settings so I adjusted it as best as I could to achieve the following:
Client 1 (1 cam): 500kbps (500kbps per camera)
Client 2 (2 cams): 500kbps (250kbps per camera)
Client 3 (1 cam): 500kbps (500kbps per camera)
Client 4 (1 cam): 500kbps (500kbps per camera)
Client 5 (2 cams): 500kbps (250kbps per camera)
Client 6 (2 cams): 500kbps (250kbps per camera)
Total Bandwidth Required: ~3mbps
After making these changes it worked like a charm and has been quite reliable ever since. We have had an issue after a power cut before but a simple reboot of the root access point resolved the issue. There was also a time when two cameras stopped working and I couldn’t resolve the issue remotely so I had to visit the hotel – when I turned up I saw that one of the antennas had been stolen! Once a new antenna had been installed everything was back to normal.
What I would do differently next time
If you are planning to use this as a guide to do something similar then you really need to read the following as there are a couple of things I would have done differently if I was going to do the same installation again. First, I would have not used Linksys WRT54GL with DD-WRT installed and external antennas. Instead, I would have used Ubiquiti Nanostation M5’s for several reasons as listed below:
- Attaching an external directional antenna to the Linksys router meant that I had to make up cables, which was expensive and time consuming – The Nanostation is an access point/bridge and directional antenna combined.
- The Nanostation M5 can be powered by PoE (power over ethernet) and also has a second port so that the Nanostation can also power a camera that is connected to it by PoE. Therefore one power injector is required for both the cameras and the access point.
- The “M5” version of the Nanostation works at 5GHz and has much less interference than the Linksys router that only worked on 2.4GHz.
- Ubiquity AirOS firmware is about 4x easier to setup than DD-WRT but has all of the functionality that is required for this job. It is also common knowledge that manufacturers firmware is generally more reliable than third party firmware …anyone that knows DD-WRT will know it can be pretty experimental, eventhough we used one of the most stable and proven builds on some of the most stable and proven hardware.
- Ubiquity is industrial grade and Linksys is home-grade. While that statement is true it does not mean Linksys equipment is not as good but the Ubiquity equipment and firmware has been packaged up in such a way that makes it more suitable for industrial installations.
If I had of used the Ubiquity equipment, especially at 5GHz I am guessing I would have been able to have achieved a higher quality and more reliable image than I was able to, especially since I was using a cable run from each access point to their antennas.
Secondly, it was a mistake to use a purpose made NVR; in retrospect I would have been far better off using a standard PC and installing the viewing and recording software that came with the cameras. This is because the NVR did have a few bugs in the system, was optimised to be used with specific cameras (that I didnt use) and I had little control over the machine.
Very helpful stuff ! Thank you for sharing this with us. I have some questions though.
At this moment I cannot seem to find Wireless IP cameras that work in this 5 GHz spectrum. This Ubiquiti’s NanoStation is a very good piece of hardware and also has a very good price for what it offers and it points out everywhere that it’s operating at 5 ghz band but what about the I choose to have installed some Wireless IP cameras in this 5 ghz band ? Where do I find those ?
Hi Marius,
You dont use “wireless” IP cameras, instead you use normal IP cameras and link them up directly to a 5GHz Nanostation in station mode, which makes them wireless. Therefore, your normal IP cameras are made wireless with the Nanostation.
I would like to add that following writing this blog post I actually did another wireless camera install for the same hotel group in a different hotel. That time we used better IP cameras with a standalone NVR and used the M5 Nanostations to network them up. The job was much much easier and the streaming performance was out of this world. The cameras all worked with the highest (wired) quality settings. I believe this was down to a combination of the 5GHz band we used and the Nanostations. We used 2 Nanostations in Access Point mode (one on either side of the hotel) to receive the transmissions. Then 6 Access Points in Station mode (3 on each side of the hotel) to send the video transmissions. It worked perfectly and I would recommend this setup. One issue I ran into was that Ubiquity PoE is not the 802.3af standard that most PoE devices use. Therefore the Ubiquity access points could not be used to feed power to the cams (unless you use Ubiquity cams, which are available). Therefore I had to buy some TP Link TL-POE150S PoE injectors.
In retrospect I can confidently say to avoid 2.4GHz at all costs due to the interference exists especially in hotels and built up areas.